Tuesday, 7 May 2019

Wainwrights - Grey Crag, Tarn Crag, Kentmere Pike and Shipman Knotts.


We only had three Wainwrights left to do here, namely Grey Crag, Tarn Crag and Shipman Knotts.  The only problem was that Shipman Knotts was on the opposite side of the valley to the other two and involved descending 230m into upper Longsleddale and then climbing something like 330m up onto Kentmere Pike. The effort though was worth it.


Parking at Sadgill just after 7.30am it was straight into it as we puffed our way up the steep intake land and onto the fellside via a short easy gully.  

Sadgill and our start point below


Things flattened out a bit as we reached the top of Great Howe. From here the going was easy if a little boggy at times.  Despite the May sunshine the summit of Grey Crag was a bitterly cold place to hang around so we found a bit of shelter for a quick break.  The difference in temperature out of the wind was considerable and set the tone for a day of constant gear faffs as we added and removed layers to try and keep comfortable. 

Summit cairn on Grey Crag. Blue skies but unseasonably cold for May

From here we could clearly see the survey pillar which sits on the top of Tarn Crag, however before heading over to it we made the rather boggy detour over Sleddale Fell to Harrop Pike. 

Harrop Pike and the view towards Tarn Crag.

Retracing our steps to where the fence turned north towards Tarn Crag we made our way over some very sloshy and at times horribly bouncy ground where a thin skin of vegetation now sits atop of what remains of Tarn Crag Tarn. The tarn is marked on the map still even though nothing can be seen on the surface!   On the summit we met the first person of the day.

Survey pillar a few meres from the true summit

From the summit we followed the fence northwest to the col where the path comes in from Mosedale.

Mosedale with Mosedale cottage below the spoil heaps

After a short boggy section in the col the ground dropped away and took us steeply down to Brownhowe Bottom. On the way down our eyes were constantly drawn across the valley as we tried to work out a line of least resistance that would lead us up the slopes of Kentmere Pike.  

We could see several pathless routes up and in the end decided to ascend via the disused Wrengill quarry so that we could have a look at what remains there.

Old engine

Tarn Crag from Wrengill Quarries
Beyond the quarries we then used a wall as a handrail to lead us to the summit of Kentmere Pike. In the shelter of the wall we were absolutely lathered and down to base layers as we toiled up the hill, only to end up feeling nithered on the last section to the summit as the wall turned southwest leaving us exposed to the strong northerly wind. Here we were also greeted by a brief snow shower.

Trig and stile on Kentmere Pike
Looking at my records the last time we were here was the 7th September 1997, so a return, while not a new tick on our Wainwright’s quest, was certainly worth the effort just to reacquaint ourselves with the summit views.

View Northwest

View Southeast

Morecambe Bay and Heyham Nuclear Power Station

Now with jumper and duvet jacket back on we did not hang around and headed off in the direction of Shipman Knotts.  On the way we detoured to Goat Scar for no other reason than it looked like it would make a good viewpoint, which it did.

Longsleddale from Goat Scar
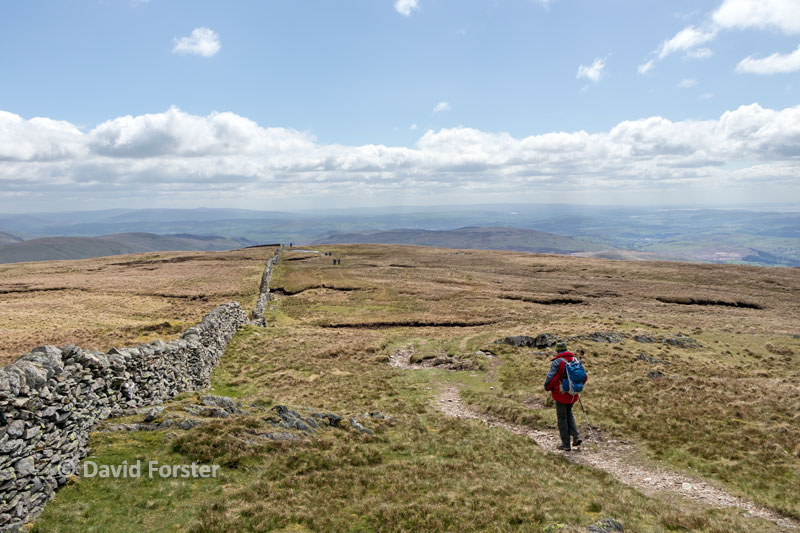
We only stopped off briefly on Shipman Knotts for a pic before making our way steeply down towards Wray Crag. 

View from Shipman Knotts back towards Goat Scar and Kentmere Pike

A very squelchy section then led us to the Stile End track.  

Nearly down. Tarn Crag (L) and Grey Crag (R) from the track

This was then followed down to Sadgill and our start point.

That’s 4 Wainwrights bagged, but only 3 new ticks as Kentmere Pike had been done previously.  This leaves us 58 to do in total and only 2 more to do (Wansfell Pike and Troutdale Tongue) to complete the Far Eastern Fells.


Friday, 3 May 2019

Wainwright’s - Sour Howes and Sallows


When we decided to attempt to complete the Wainwright’s one of the reasons was to encourage us to get onto hills we would probably not have either thought of doing, or indeed, did not think worth the effort. Sour Howes (483m) and Sallows (516m) are good examples in that they are relatively low is stature and tend to be overlooked in favour of higher neighbours such as Yoke and Ill Bell. In addition being located on the southern side of Kirkstone Pass makes them quite a drive for us, so all things considered they would not normally appear on our radar. 

Parking at Church Bridge we made our way along the Garburn Road accompanied by a few fleecy early morning commuters.

The Garburn road
The track is an old packhorse route linking Troutbeck with Kentmere. There are several similar ones here and after a few hundred metres we crossed another called the Longmire Road.

The Garburn Road runs along the lower slopes of both hills, but we left it after a kilometre or so and after crossing yet another track, this one is called the Dubbs road, we began making our way diagonally up the hillside on a faint path.  This is marked Applethwaite Common on the map and as height is gained there are good views over Windermere.

Windermere
Just before the summit we came to a boundary wall.

Wansfell/Baystones, a Wainwright we have yet to do, with Troutbeck and Town Head in the valley below. 
After crossing the wall we found ourselves weaving between several hummocks, a few of which could probably lay claim to being the highest point of Sour Howes. 

As usual we wandered onto the highest ones just for the hell of it. The Wainwright top however is a little knoll in the centre. As Moira often says when we are trying to find the exact spot, you can usually tell the Wainwright top as it always gives the best views regardless of whether it is the true summit or not.  This was certainly true here and the other main top we checked out, while appearing a similar height, did not enjoy such a good a outlook.

Summit of Sour Howes with Windermere beyond

Moving on we began following a drystone wall towards Moor Head.  After a few hundred metres we crossed the wall on a stile and began the ascent of Sallows.  The going was easy if a little boggy in places and we soon found ourselves on the summit.

The summit of Sallows is marked by a couple of small stones. 
Celebrating the completion of another two hills with a coffee and a sarnie another couple arrived.  They were easy going Wainwright baggers too and like us happy to chat about all things outdoors. As is often the case when meeting strangers we had loads in common and as well as being keen campervanners like us, they actually had family connections in Teesdale where we live.

They were heading back the same way as us so we descended the hill together. We hardly noticed the 3km walk back along the Garburn road as we chatted about travels in common and put the world to rights.

Garburn road and the view towards Windermere

All in all a great day out with some good company on two lovely little hills we would never have given a second thought to. As our Wainwright journey continues I suspect there may well be a few more gems like these hidden in plain sight.

That’s 2 more Wainwright’s done, leaving us 61 to go.

Friday, 26 April 2019

Wainwright’s - Beda Fell and The Nab


Of all the Wainwright’s the Nab was one I wasn’t particularly looking forward to. This is a hill where access restrictions are in place due to deer management and conservation.  Frustratingly despite this being open access land the walker is discouraged from accessing the fell by any of the shorter approaches/descents.  Instead you are expected to access it from the south via boggiest and longest routes possible. When deer management is taking place (being shot) between September and February then the whole area may even be closed to walkers.

Being outside of the culling season, but still I assume with restrictions in place ,our plan was to climb Beda Fell and then work our way around the head of the valley via Angle tarn and then access the Nab via the western shoulder of Rest Dodd. 

Sign near the church.

Parking beside St Martin’s Church, which unfortunately was locked at this time of a morning, we made our way over Christy Bridge to take the path leading onto Howstead Brow.

St Martins Church

Christy Bridge with Beda Fell ahead

Howe Grain Beck with the View towards the Nab (centre)

Here there was a handy seat with good views towards Hallin Fell, Gowbarrow Fell and Place Fell, among others.

Hallin Fell from the Seat on Howstead Brow

Next we climbed up to Winter Crag. 

Moira on Winter Crag with the view towards the summit of Beda Fell (Beda Head). The summit is just left of centre.  The north top is to the right.

From Winter Crag it was a steady pull up to a prominent cairn which marks the north top of Beda Fell.  

Cairn on the north top and the view west towards Boredale Hause and Fairfield. Place Fell is to the right of the cairn

The actual summit of the fell at Beda Head is quite a bit further south.

The summit from the north top. 
The summit soon came and gave us some good views north over Ullswater.

The summit cairn with Ullswater below and from (L-R) Gowbarrow, Great and Little Mell Fell and Hallin Fell.

Ullswater

From the summit the Nab looked a long way off and considering we had to make our way around the head of the valley it looked like it would be a quite an effort, especially so if we had to retrace our steps for a good part of the way. 

The view south towards the head of Bannerdale with Rest Dodd on the left.  We planned to traverse around the head of the valley and then cut just below the summit of Rest Dodd to reach the Nab which is just out of shot to the left

For Moira and I being in the hills is not just about exercise and ticking off summits, we also like to explore a little. In particular we always keep an eye out for wildlife, or detour to seek out places with some geological or historical interest.  Some time ago I had read of a plane that had crashed up here during the Second World War. The aircraft, a Lockheed Hudson MK 5 (Serial Number AM680) came down here on 10th November 1942 while on a night navigation exercise.  

Initial searches for the aircraft from the air were unsuccessful due to poor weather, but late the following day the aircraft was found by searchers on the ground.  Sadly none of the crew, John Frederick Saunders (Pilot), Derric Isaac Jones (Navigator/Air Bomber), Stanley Alfred Jones (Wireless Operator/Air Gunner) and Harold Dickinson (Wireless Operator/Air Gunner) survived the crash.

There is no memorial so I doubt many walkers would be aware of their sacrifice, but as we were to walk within a few hundred metres of the crash site we decided to stop off and pay our respects.  

Not much remains now other than a few small pieces of aircraft where the aircraft impacted the hillside. If you walk this way perhaps you could spare a few moments to remember to the crew as you pass by.

Wreckage from the aircraft with the summit behind

Making our way around the head of the valley we passed Angle Tarn, but decided to miss out the summits of the nearby Angle Tarn Pikes and Rest Dodd as we had done these previously. 

Angle Tarn and the view towards Helvellyn and the Dodds

Angle Tarn from the slopes of Rest Dodd

Traversing across to the northern side of Rest Dodd we eventually found ourselves looking over some very boggy looking peat hags between us and the Nab.


The Nab with its peat hags and bogs guarding the way

This section is notorious for its boggy qualities but fortunately the recent dry weather meant the boggy sections were not too bad and our feet stayed dry.  In the heat it was still a bit of a slog to the summit though.  

The summit of the Nab with Beda Fell and the Helvellyn range beyond

Happy

To get back down it was a choice of either retracing our steps all the way back up to Rest Dodd and then around the head of the valley, or a much easier and rather more pleasing route down the open access land to the valley floor.

Back at the car we had a look around the old church and then headed outside to look at the ancient Yew tree which is thought to be at least 1300 years old. 

Carved altar table


The ancient Yew with the tomb of Richard Birkett who was the first priest of St Martin’s in its shade

All in all a cracking walk, even if we did not see a single deer all day!.

That leaves 63 left to do. 

Tuesday, 23 April 2019

Wainwright's – Silver How, Blea Rigg, Sergeant Man, High Raise and Tarn Crag


Yet another of those rounds where we knew we had done some of the other hills before, namely Tarn Crag and Sergeant Man, but as we did not have any photos or dates of ascent a revisit had to be made. 

This would be a biggish day for us and unsure of our fitness we planned a couple of escape routes down to Easedale Tarn if needed.

An early start found us wandering through Grasmere village just after 7.30am. Ahead we could see our first hill of the day - Silver How

Silver How from Grasmere

The hike up to Silver How via the track leading from Red Bank road seemed hard work at first, but by the time we reached the path junction leading up to the summit we had got our second wind.  

Looking back towards Grasmere from the Silver How path.

The summit of Silver How with the View towards Helm Crag (R)
Despite the sunny spells it was bitterly cold on top so we scurried across towards Blea Rigg via some lovely tarns.  

Moira crossing below Lang How
Skirting the impressive wee hill of Lang How and several more small tarns we eventually found our way onto the craggy summit of Blea Rigg.

Blea Rigg from one of the craggy high points 
From Blea Rigg we could have worked our way across to Tarn Crag to cut the day short, but feeling fairly good we decided to do the longer round and started making our way to Sergeant Crag.  On the way we found a sheltered spot for a break which gave good views of Harrison Stickle and Pavey Ark.

Harrison Stickle and Pavey Ark from the Blea Rigg to Sergeant Man path
Moving on we threaded our way between small hills and crags before working our way up to the summit of Sergeant Man.  On top we met a couple doing their first ever hill.  They said they had got a bit lost on the way.  By their own admission they did not have a map, or compass and were just using an article torn out of Trail magazine and a phone to navigate! 

Sergeant Man with Coldale Head beyond
We have been on High Raise several times but given the good visibility we had a wander over to take in the views.  

High Raise with the view west
Just as I reached the trig and lady came up to me and asked if I was heading to Grasmere.  I pointed the way we had come and said Grasmere is that way.  She looked surprised and said oh I thought it was that way as she pointed in the opposite direction.  I could of course see how that mistake could be made if you were navigating with just a guidebook, which was all she appeared to be using.   Pointing to Sergeant Man I said perhaps the easiest way would be to head to that and then follow the path to the left of it down to the tarns.  “Oh dear” she said, “I think I have got myself a bit confused I actually came up that way”.  I was going to add that she could follow us back towards Codale Head and we would show her the path, but she tootled off before I could say anything. 

After wandering around and grabbing a few pics we followed the remains of an old boundary fence towards Codale Head. 

Sergeant Man from Codale Head

From here we began working our way down through rough ground and up onto Tarn Crag.

View down towards Grasmere from Tarn Crag

While there we had a wander over to another cairn from which we had good views over Easedale Tarn towards Windermere.

Cairn above Easedale Tarn

Easdale Tarn from just below the Cairn
Dropping down we then trended rightwards across boggy ground to cross Sourmilk Gill a couple of hundred metres below the outlet of Easedale tarn.  

The main path was then followed down Easedale and then into Grasmere.

That's 5 Wainwright’ completed but only 4 new ticks. That leaves 65 left to do